Getting ready to use YouTube Video Background — a step-by-step walkthrough for first-timers
*This feature is currently offered as a beta. In some cases the video may not play, or a different video may be selected.
What you'll do on this page
NeoN VJ's "YouTube Video Background" is a feature that searches YouTube for the music video of a recognized song and shows it in the background. What powers this "search" is an API key — think of it as your own personal key for using YouTube's data search.
This page walks you through creating an API key on Google's site and setting it up in NeoN VJ.
Before you start, a few things to know
It takes about 15 minutes.
There is no charge. No credit card registration is required.
All you need is a Google account (the one you use for Gmail or YouTube).
You'll come across unfamiliar words like "API" and "project" along the way, but each is explained as it appears. Even if the meaning isn't clear, just follow the steps and you'll get there.
💡 The screenshots on this page show Google Cloud in Japanese, but the buttons are in the same places in every language. Button names and locations may change when Google updates its site. If you can't find something, look for a button with a similar meaning, or use the on-screen search.
Step 1: Check your Google account
If you already use Gmail or YouTube, that same account works as-is. There's no need to create a new one.
The "Google Cloud Console" is the management screen for Google's services. It's aimed at developers so it looks a bit technical, but you'll only use a small part of it.
The first time, a terms-of-service agreement screen appears. Review it, check the box, and press "Agree and continue".
💡 You may see prompts for a "free trial" or a "billing account," but you don't need to sign up. Nothing in this guide incurs charges. Close the prompt and continue.
Step 3: Create a project
A "project" is like a working folder inside Google Cloud. You'll create your API key inside this folder.
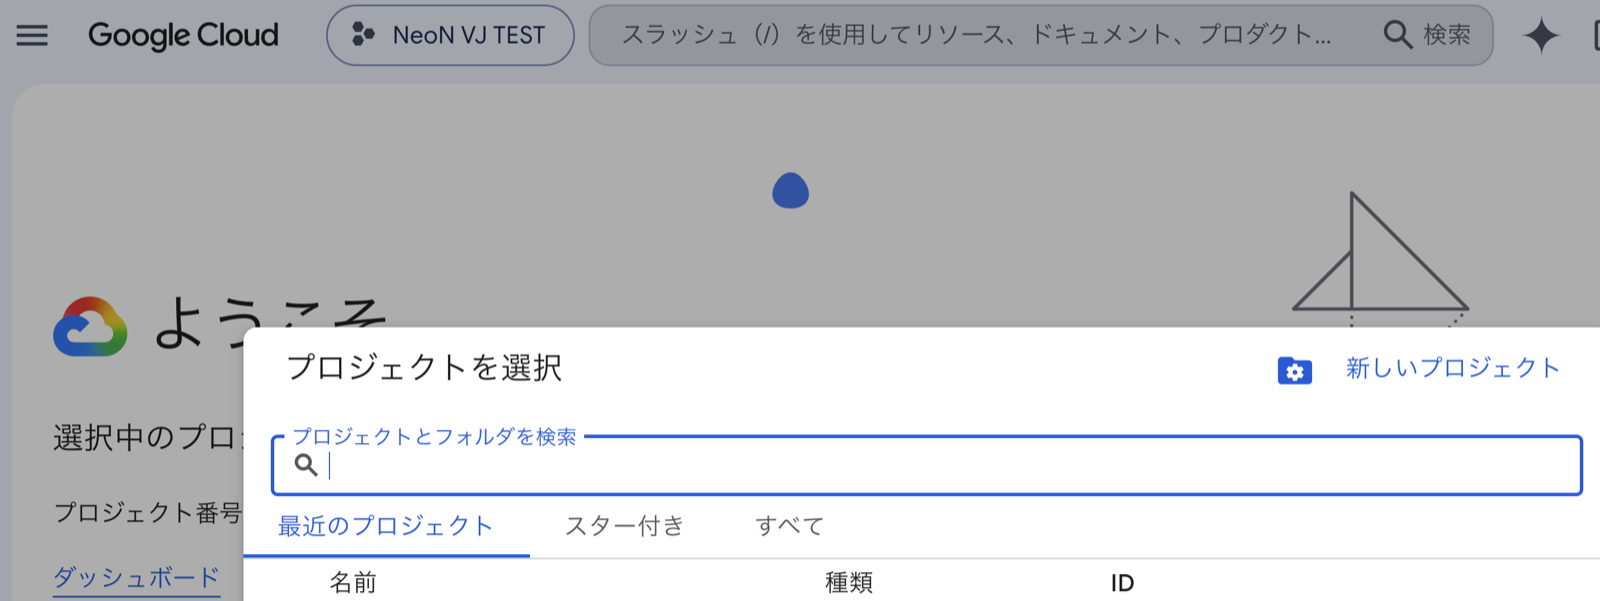
Tap the project-name button at the top of the screen — the spot labeled “NeoN VJ TEST” in the image below (if this is your first time, it says “Select a project”)
The "Select a project" window opens; press "New Project" in the top right.
Press "New Project" in the top right of the "Select a project" screen
Enter a project name. Any name is fine (e.g. NeoN VJ). Leave "Location" as "No organization".
Press "Create" and wait a moment.
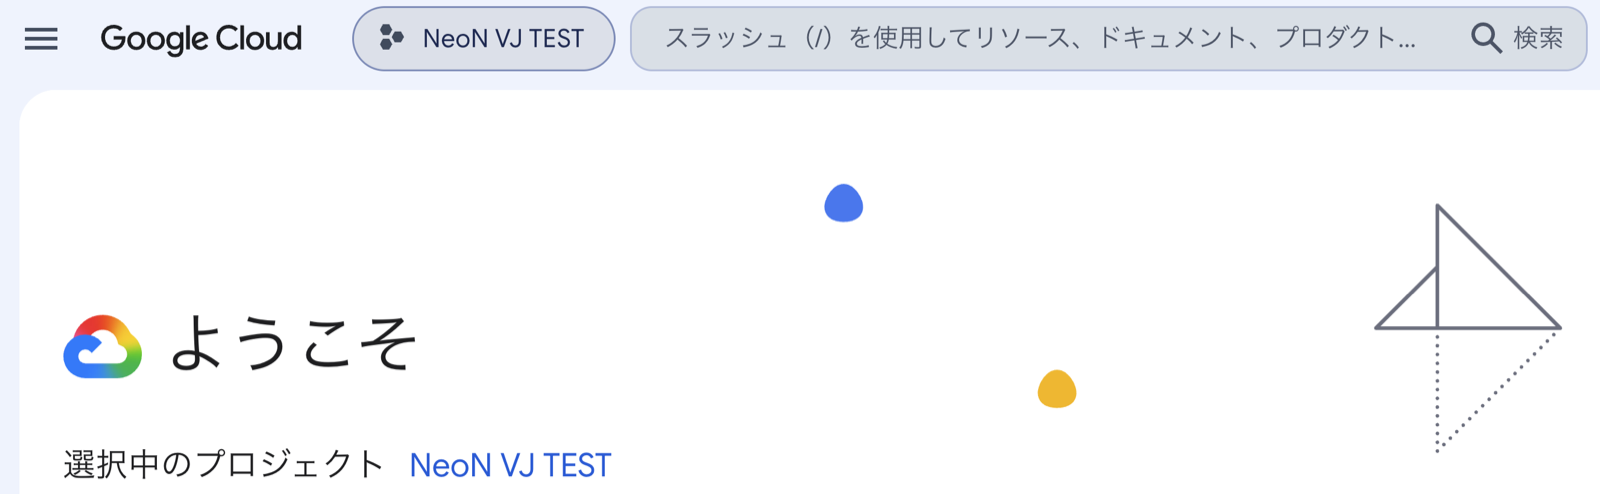
Once created, select the project you just made from the "Select a project" menu at the top. You're set if the chosen project name shows at the top of the screen (inside the frame in the image below). Skip this and you'll get lost in the next step.
The project is selected. You're good if your project name appears at the top button and in the current-project area (here it's "NeoN VJ TEST")
Step 4: Enable the YouTube Data API v3
The word "API" comes up here, but just think of it as a switch that lets your project use YouTube's video-search feature.
From the menu (☰) at the top left, choose "APIs & Services" → "Library".
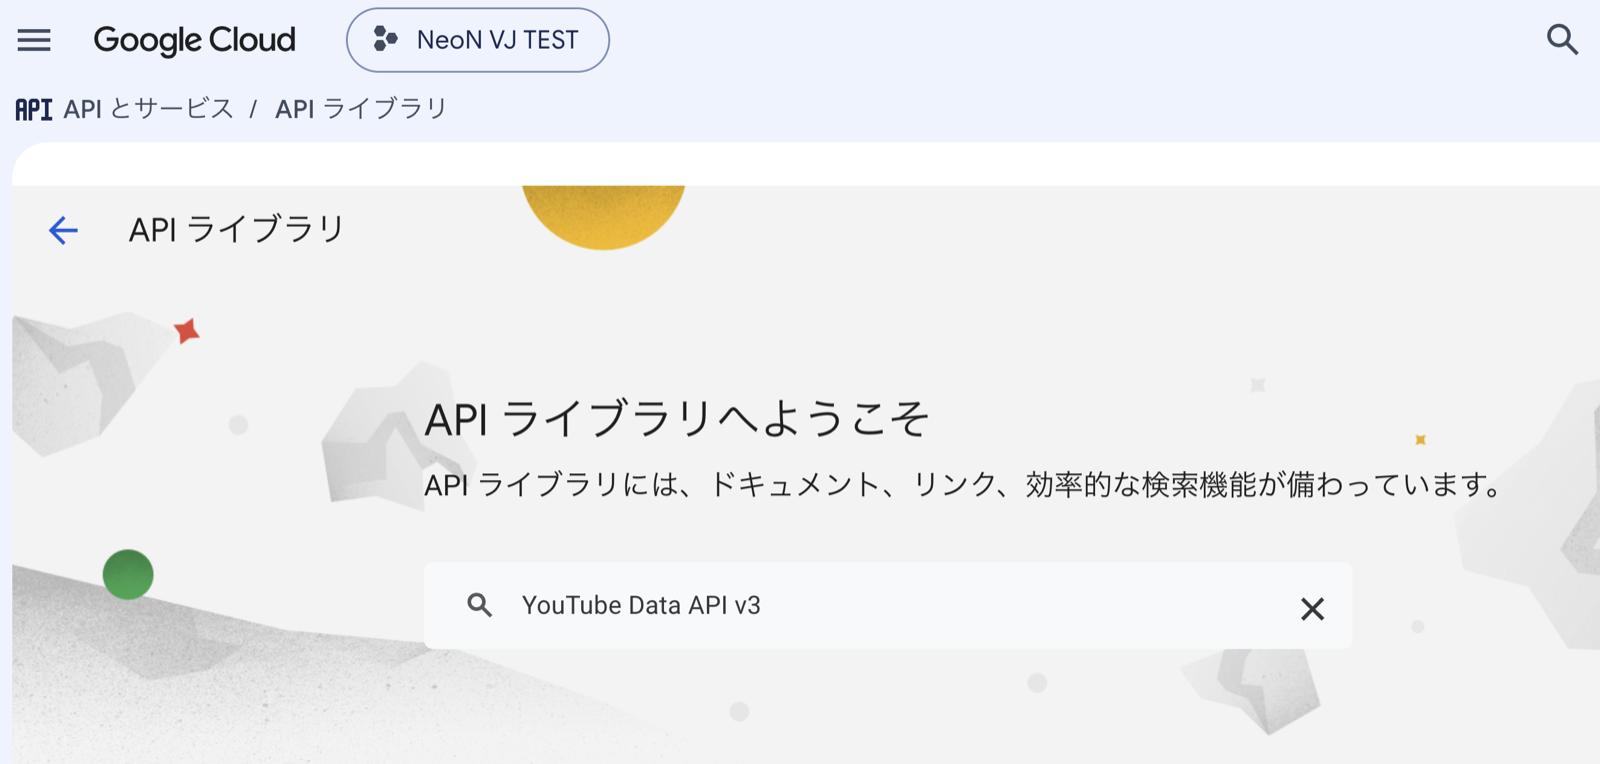
When the "Welcome to the API Library" screen appears, type YouTube Data API v3 into the search box and search.
Type it into the search box on the "Welcome to the API Library" screen
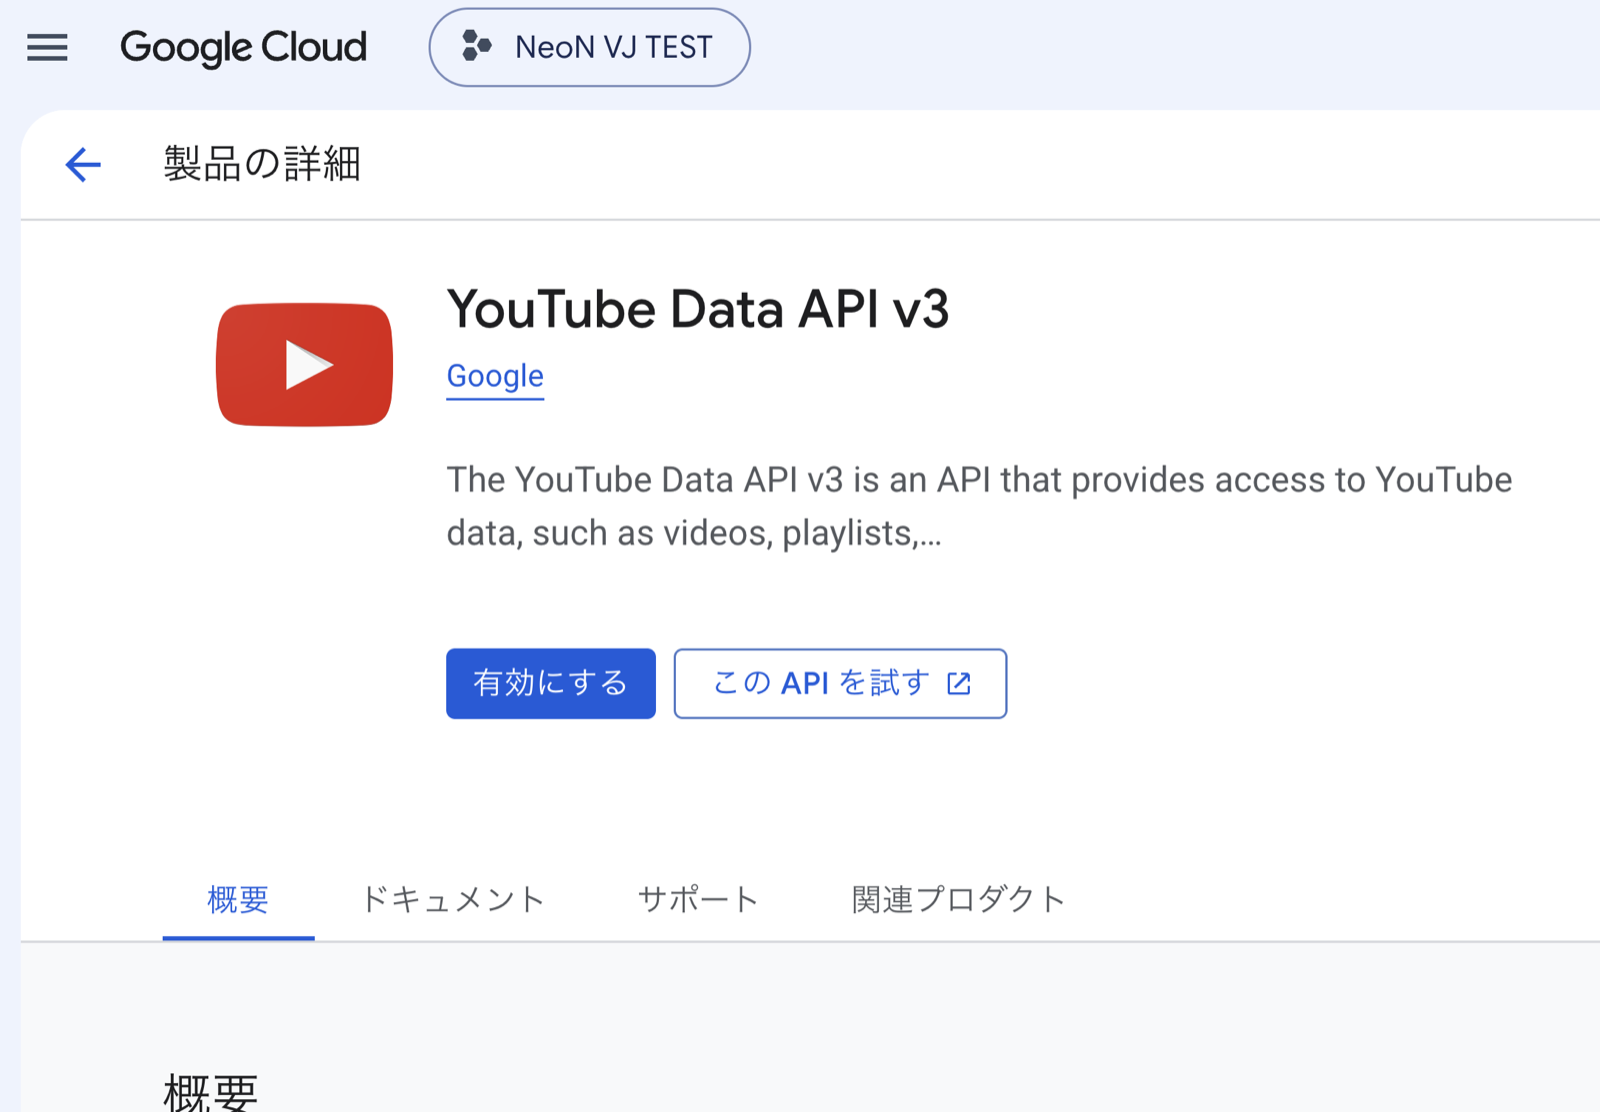
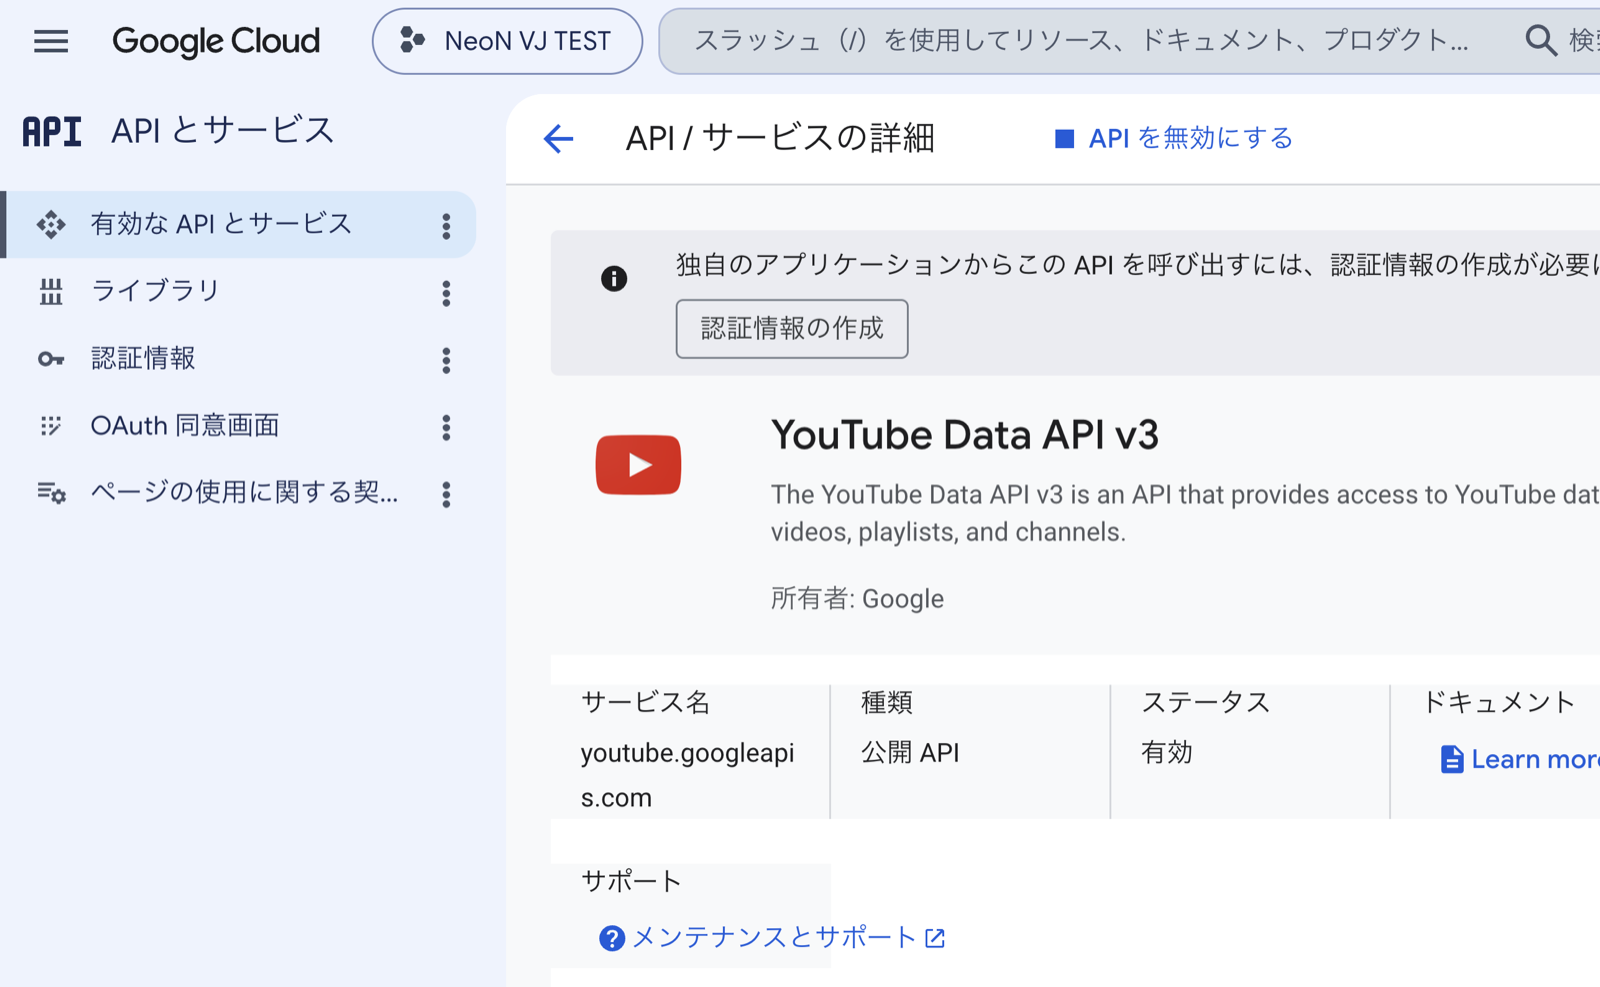
Press "YouTube Data API v3" (the red play-mark icon) in the results, then press the "Enable" button.
Press "Enable" (you won't use the "Try this API" button next to it)
The screen changes, and this step is done once it shows "Status: Enabled". A notice about "credentials needed" may appear at the top, but that's what we create in the next step, so leave it as-is.
Enabling is complete (Status: Enabled)
Step 5: Create the API key
Now to create the key. On the creation screen, you'll also take care of protecting the key (recommended) right here.
Choose "Credentials" from the left menu (if you can't find it, go ☰ → "APIs & Services" → "Credentials").
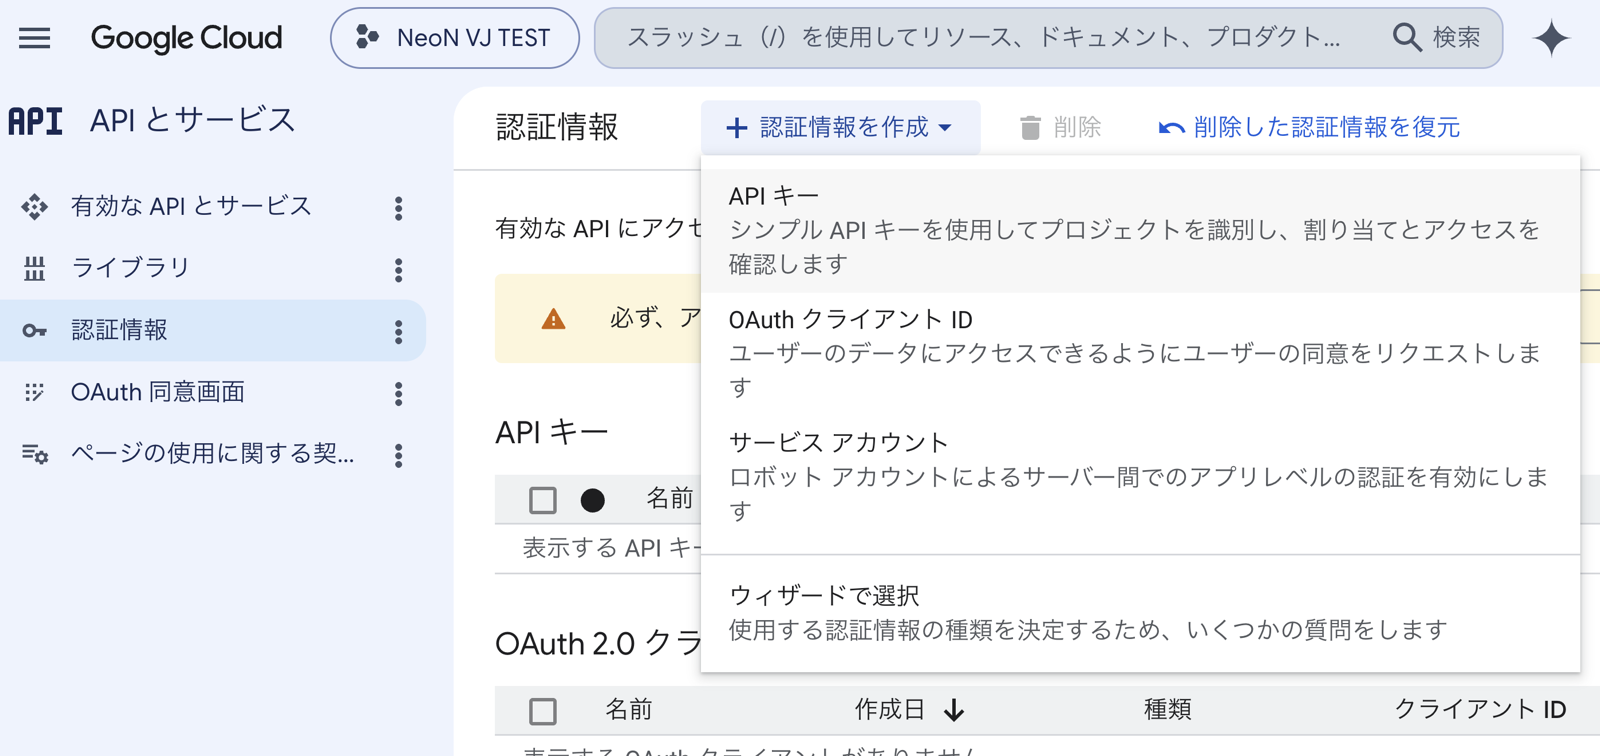
Press "+ Create Credentials" at the top and choose "API key".
"+ Create Credentials" → choose "API key" at the top
The key settings screen opens. You can leave "Name" as API key 1.
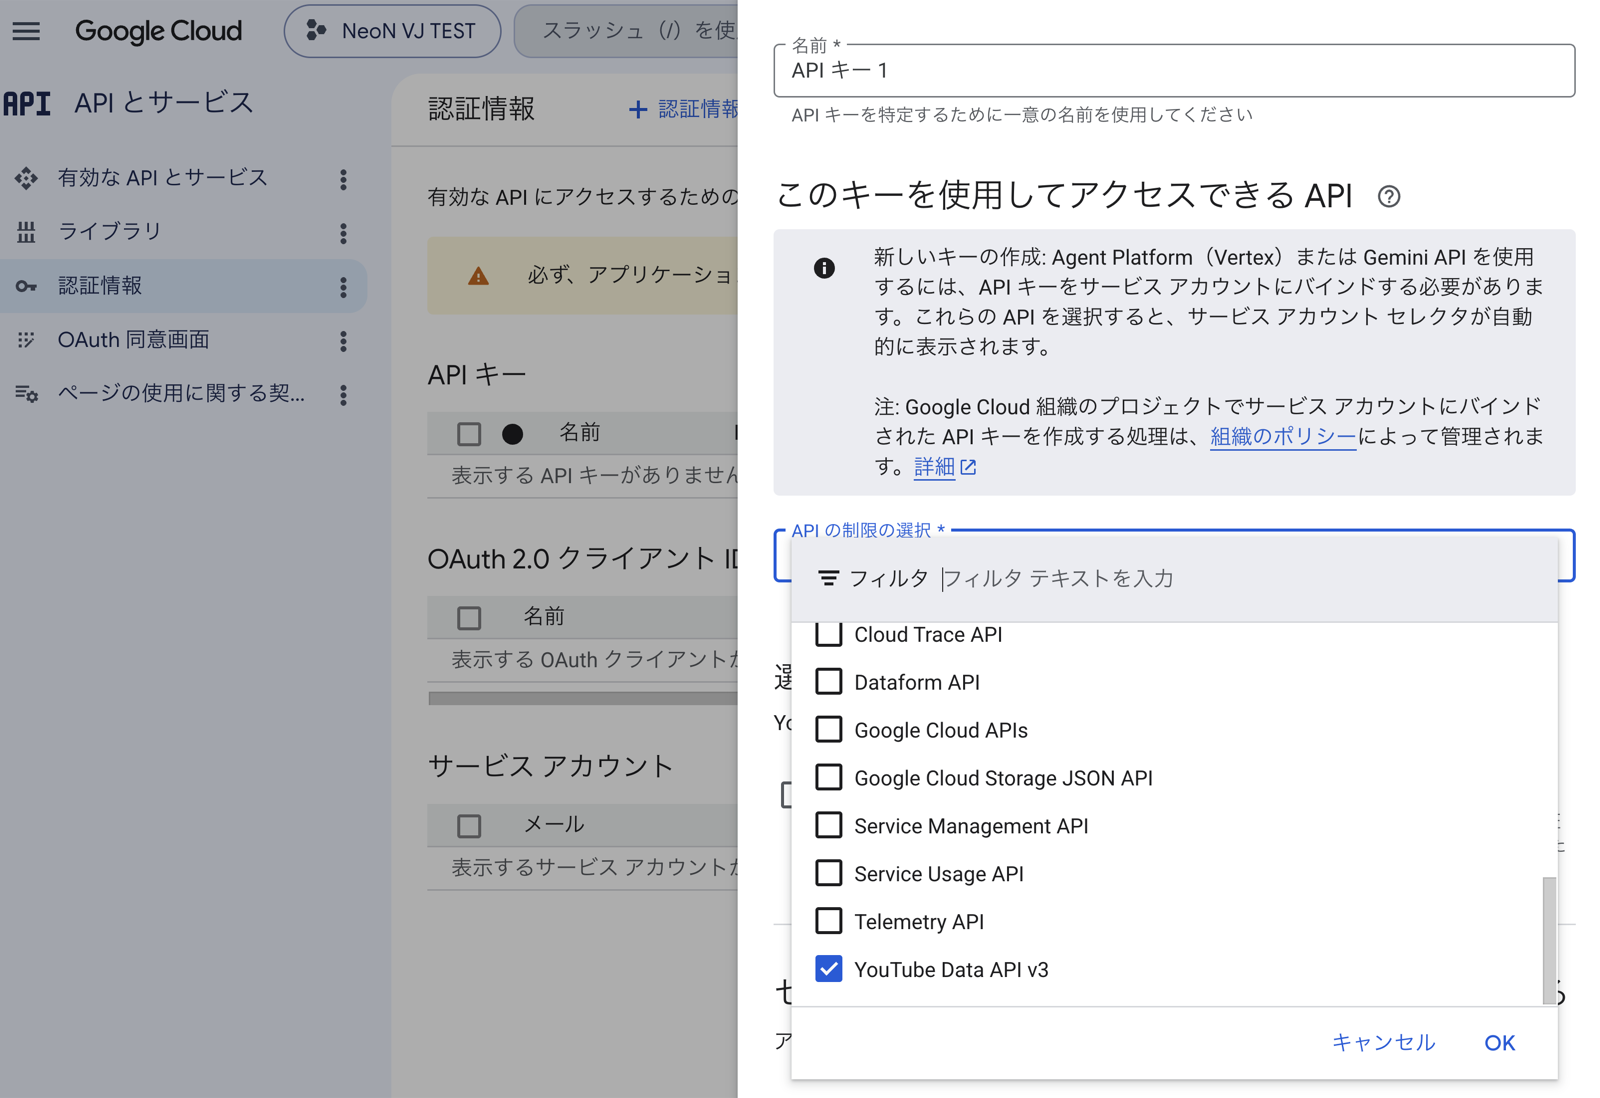
(Recommended) Under "API restrictions", press "Restrict key", check only "YouTube Data API v3" in the list, and press "OK". This is insurance so that, if the key ever leaks, it can't be misused for other purposes.
Check "YouTube Data API v3" (near the bottom of the list) → "OK"
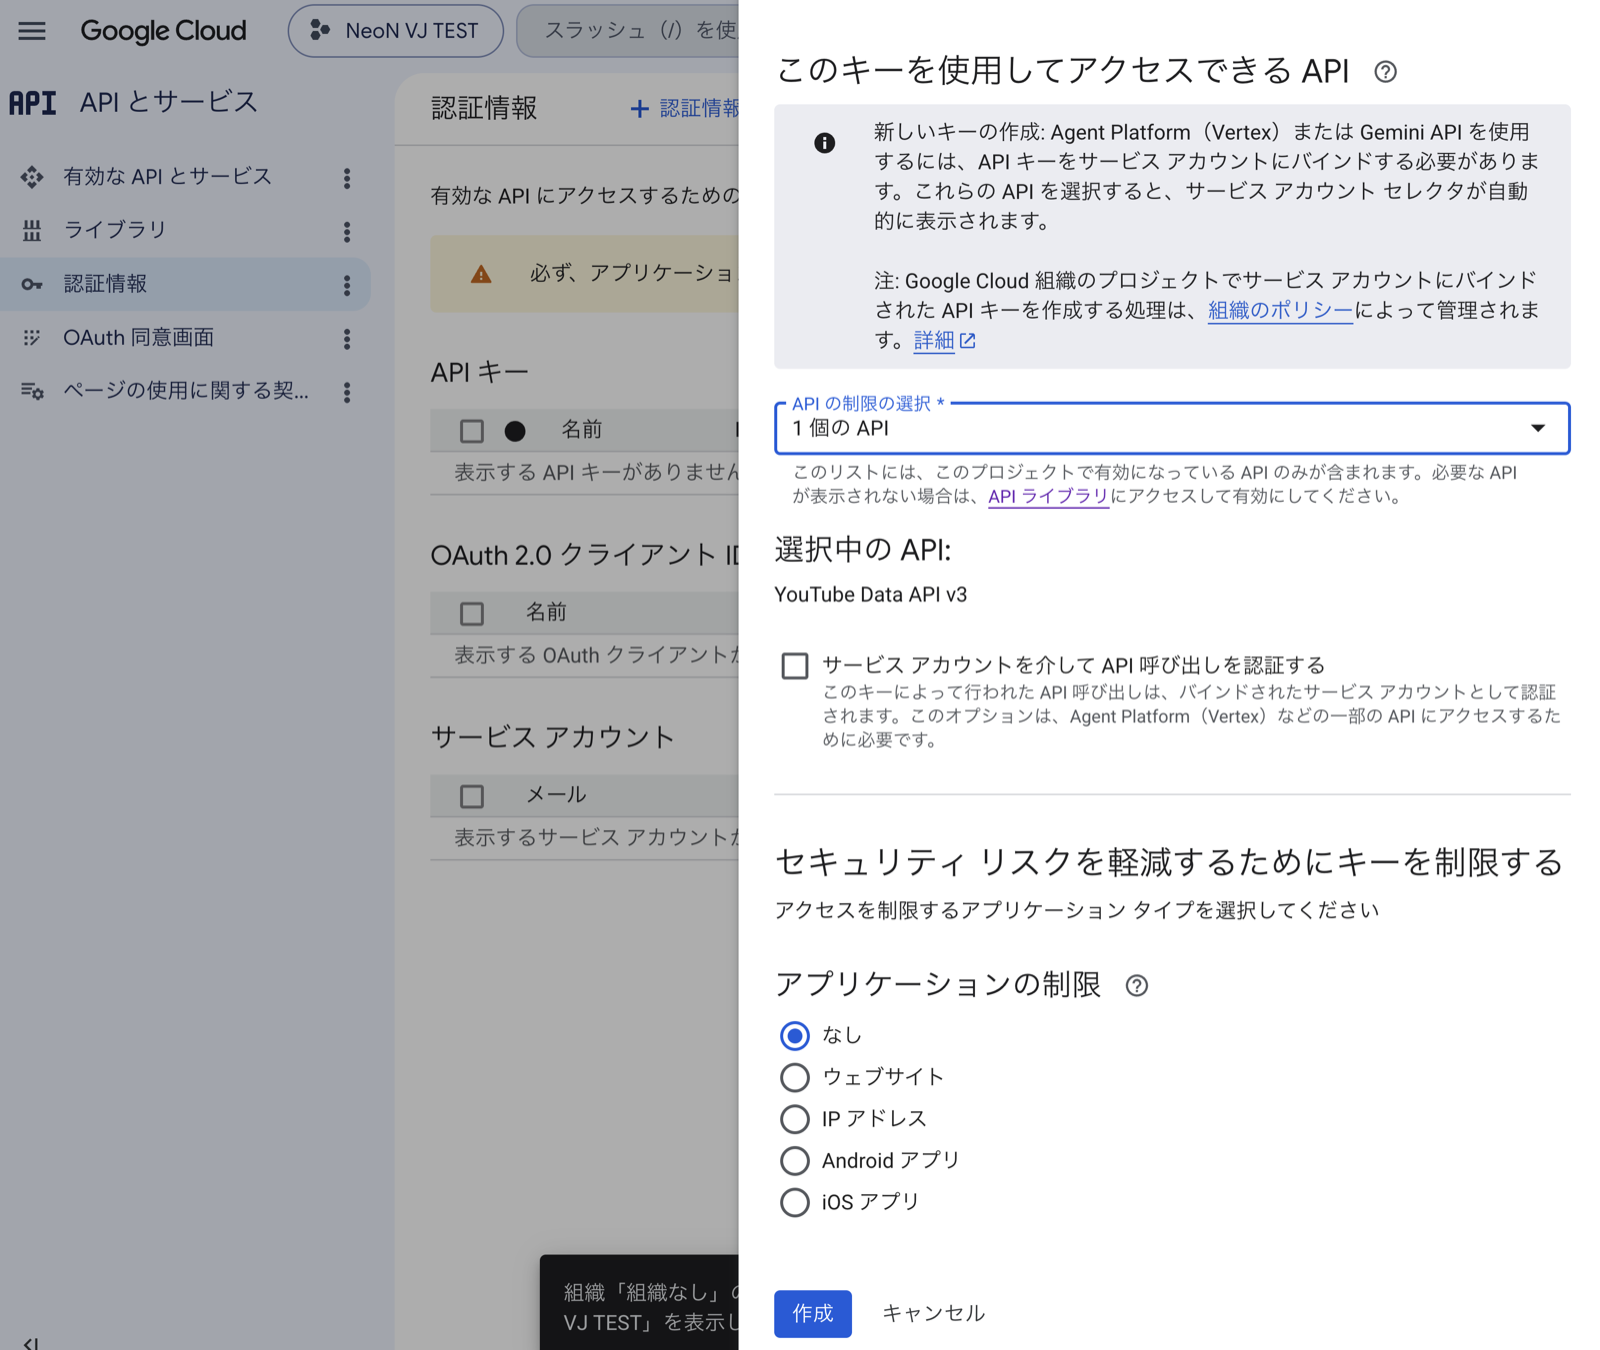
Leave "Application restrictions" as "None" (changing it may make the key unusable from NeoN VJ).
Press "Create" at the very bottom.
Leave "Application restrictions" as "None" → "Create"
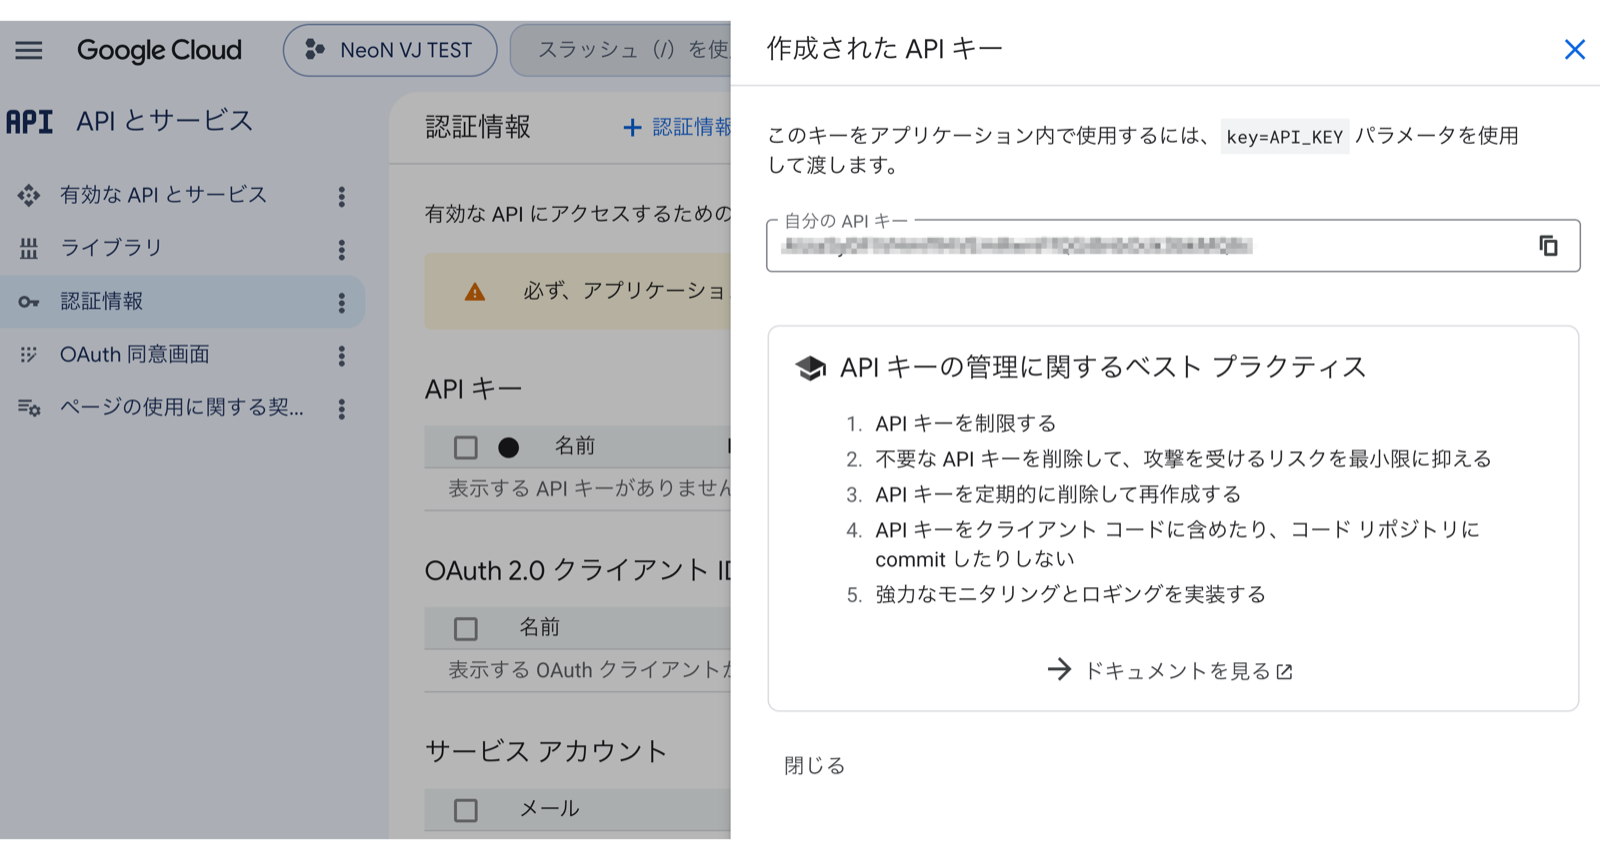
The "API key created" screen appears. A long string starting with AIza... is shown in the "Your API key" field, so copy it with the copy button on the right and press "Close".
This is your API key. Copy it and "Close" (you can check it anytime later on the "Credentials" screen)
⚠️ Do not share your API key with anyone. If you accidentally expose it on social media or in a screenshot, delete that key from the "Credentials" screen and create a new one to stay safe.
Step 6: Set it up in NeoN VJ
Open Settings in NeoN VJ and turn ON "Show all settings menus".
Paste the copied API key into the input field under "YouTube Video Background".
Press "Save & Verify". The app automatically checks the key's status.
When ✅ appears, setup is complete. Turn the feature ON and enjoy.
💡 If you obtained the key on a computer, the easiest way is to send the string to your iPad via a notes app or AirDrop and then paste it. If ❌ or ⚠️ appears, see "When things don't work" below.
Frequently asked questions
Question
Answer
Is it really free?
Yes. The YouTube Data API has a free usage quota, and normal use of NeoN VJ stays within it. No credit card registration is needed. Because this API has no paid plan at all, reaching the limit never switches you to billing — search simply pauses until the next day. "I got charged without noticing" cannot happen.
How much can I use per day?
Video search is roughly 100 songs per day as a guide (per Google's free quota). The app's settings screen has a usage meter, and when the limit is reached it resets automatically the next day (midnight Pacific Time).
Are there ads on the videos?
Videos play in the YouTube player, so ads may play according to YouTube's own specifications. Whether and when ads appear is decided by YouTube and cannot be controlled by the app.
I lost my key
You can check it anytime under "APIs & Services" → "Credentials" in the Google Cloud Console.
When things don't work
Depending on the result of "Save & Verify", check the following.
App message
Likely cause and fix
❌ Key is invalid
Check that no extra spaces or line breaks got in before or after the copied text, and paste it again.
❌ API is not enabled
Step 4 isn't finished. Also check that you created the key in the project where you enabled the API (see "Select the project" in Step 3).
⚠️ Check key restrictions
You may have over-restricted in Step 5. On the "Credentials" screen, tap the key name to open it, set "Application restrictions" back to "None", and "Save".
⚠️ Limit reached
You've used up today's free quota. It resets automatically the next day.